
PART 1

We are not going to buy one – we are going to Make Our Own.
The theme of my life. As a teenager I would see cool clothes I wanted and my Mum would say “I can make that for a fraction of the price” and my heart would sink and now I have a husband who says exactly the same. I guess I am being unfair as homemade does not mean badly made – especially in my Mum’s case but sometimes when Simon and I attempt home made it doesn’t quite go to plan. There isn’t an awful lot of Right First Time in this house but I suppose we always get close enough in the end.
When it came then to moving here fulltime and thinking of how we could grow our own food Simon was already plotting The Great Polytunnel Build. My husband and I did not grow up on the land and so everything we have done here has been trial and error and without the aid of the magical internet our life would be much harder.
So in general when new jobs need doing I wish there was a manual that told you all the things you would inevitably do wrong before you actually do them. Of course we would have to follow what it said and therein lies the rub. Perhaps the problem is one person in this marriage wants to ponder all sides of the project before starting, worrying incessantly and annoyingly, so I am told, about the health and safety points and whether with a bit of thought we could do it better and the other jumps in with both feet before there has even been a full risk assessment or safe system of work drawn up. So I guess your thinking I would be the one reading the manual. Wrong, Simon would be the one to read the instructions and then totally ignore them and I would be the one believing Simon knew what he was doing, wrong again. The result is we often do easy things twice, and then we have a bit of a rant when I say we should have done it my way and Simon explains the beauty of hindsight. Yep wedded bliss is great. Simon is a totally fly by the seat of his pants, use any old stuff lying around and generally patch it together till it fits type of guy. He adapts what he has learnt to suit himself and sometimes it works and sometimes it doesn’t.
So why did we think a Polytunnel was for us?
We had terrible land really, stony, dense and claylike, it hadn’t been tilled for over 20 years and in reality had never been used for growing anything on. The site sustained cattle whilst the grass would be cut May to Sept and used for haylage. We know this thanks to our nearest neighbour who used to work on the land for the farmer and in fact used to live in the old house (see main pic) that stood here when he was as a single man.
The land was full of reeds and rocks and was very difficult to dig into. The idea of an enclosed area where raised beds could be built and the soil worked on over a number of months before planting seemed the best bet. As we came in the September the tunnel was one of the first jobs so that we could do the preparation for the following spring.
Polytunnels allow the growing season to be extended all year round and in the Irish climate where summer can sometimes be very uncertain it gives us an opportunity to grow veg that would otherwise struggle to survive in the outdoors. The extra heat the tunnel generates is much needed and provides a barrier to frosts that occasionally come as late as May. This year of course we are also growing some veg outside but the tomatoes and peppers are basking in the tropical heat of the tunnel and loving it. With the crazy possibility of Caribbean sunshine followed 5 mins later by hailstones the size of golf balls the tunnel allows the gardening experience to carry on even in the worst weather.
Another reason “We” picked a tunnel is that they are budget friendly which is like winning the grand prize for Simon. You can with a bit of sofa surfing find a number of companies willing to sell you some pretty pricey tunnels, these can be installed by professionals and will sit gleaming in your garden looking taut and spectacular, or you could buy a kit and erect it yourself, or you could simply do what we did and build it yourself from sticky back plastic and straws- joking of course but it is not far off.
The Big Build
We cant and wouldn’t take the credit for the idea behind our DIY tunnel as there are a number of guys out there on allotments and plots all over the UK using water pipe for their outdoor erections. However as with all the Coe constructions we do have to add a little uniqueness that is just ours. See if you can spot what that is before I tell the entire story.


Here’s what we did/What we used
We decided the size of the tunnel – just a little one really – 42ft by 14ft.
Old scaffold pipes which we had from a scaffold tower that had bent were cut down to about 4ft in length and then knocked into the ground. We placed the first tube to start, one each side and then placed 8 more per side approx. 5 feet apart. Each tube was knocked in to a depth of about 1 foot.
What we didn’t do was accurately check each pipe was in line or use a spirit level to check all were knocked in to same level (mistake number one)
Wooden tree posts – from the local garden centre- These were knocked into the scaffold pipes to elongate the posts. We used these as the uprights into which the water pipes were screwed. This took some welly to knock these posts into the pipe I can tell you. On the joint of each scaffold and fence post cushioned tape was wound to smooth any sharp edges. This is essential to ensure the plastic does not get damaged.

Double sided Foam Tape to cushion 
Tape visible on each upright on edges to avoid tears.
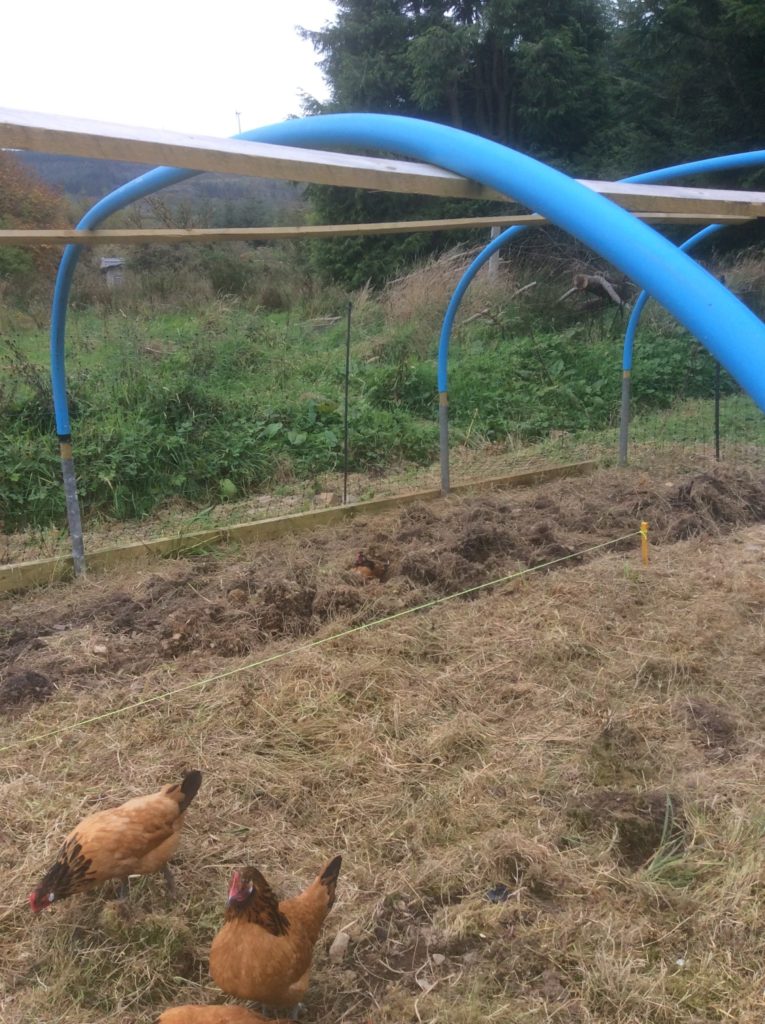
50 MM water pipe – rigid and difficult to bend, provides the structure for the hoop – this part is at least a two person job. Each hoop was situated over the end of a fence post one end at time- the fit is tight to avoid any slippage and then the first end was screwed in place. The pipe was then bent into position and screwed onto the opposite post. Essentially your hoop should achieve a lovely soaring arc – however ours looked pretty flat at this point and to be fair as the poles were not straight and we didn’t achieve a consistent fit on each pole the hoops were all different shapes and sizes (mistake number 2)
Having revisited the many videos and websites that discuss these polytunnel designs it has now become clear this was the point where we made our largest error. The original measurements said and I quote – “For a 10ft wide tunnel use 19 ft of pipe for each hoop”. Oh dear – the Coe tunnel is 14ft wide, so you would be forgiven for thinking we did some maths and made our lengths of pipe at least 26 ft. long. Oh no we didn’t – Simon already had some tube bought cheaply and so he just divided that length up – why would I buy more said Scrooge Coe- the lengths were far too short, but I didn’t question the garden guru as surely it wouldn’t matter that much – how wrong I was.
I was dismayed once I saw that the hoops were never going to be actually hoop shaped !! Never fear said the intrepid Mr Coe we can fix it. We will put some wood down each side to “push” all the pipes up to the same height and into a more hoop like shape. Well as the picture shows that didn’t work either but onwards and upwards Mrs Coe.
Having built the hoop shape you need to encase the scaffold pipes at the base with a wood frame work.
Treated Wood – 4 inches by 2 inches – 16ft long – This formed the rectangle shape surrounding the entire structure but at this point the wood was just loosely attached to the scaffold pipes with builders metal tape. This wood then acts as securing point for the cover to help you achieve the tautness.
The same type of wood can then be used to build a framework at each end of the tunnel to create the doors. Tunnels have doors at each end to increase the air flow through then tunnel – if not the tunnel would be so hot it would be unbearable. As you can see no chance of our tunnel becoming too hot as we didn’t get the memo about creating the door frame in advance of covering the tunnel. This was one of those days when the wife knew that it would be best to keep her witty but sarcastic comments to herself

BUT where’s the fun in that?
Come on back to see if we managed to complete the big polytunnel build with both of us in one piece and what happened next in the Coe garden
In the meantime
Just Breathe
Steph